It regularly occurs that multiple organizations work together and are involved in one study. In that case it would be convenient to be able to see which organizations they are and who the first contact person for the research is, etc. It is also convenient to be able to determine how many patients are linked to every participating organization, to be able to then keep this separated – for example when randomizing patients.
To make all these things easier for you, ResearchManager has developed the function “sites”. A site is an organization that participates in a study. Not only patients are linked to a site, but also researchers or other personnel. This way you can instantly see to what organisation someone belongs to.
Roles that sites are allowed to add to studies
If you have the role of application manager or data manager in the application, you can add sites to studies. Here you read more about how that works.
Steps
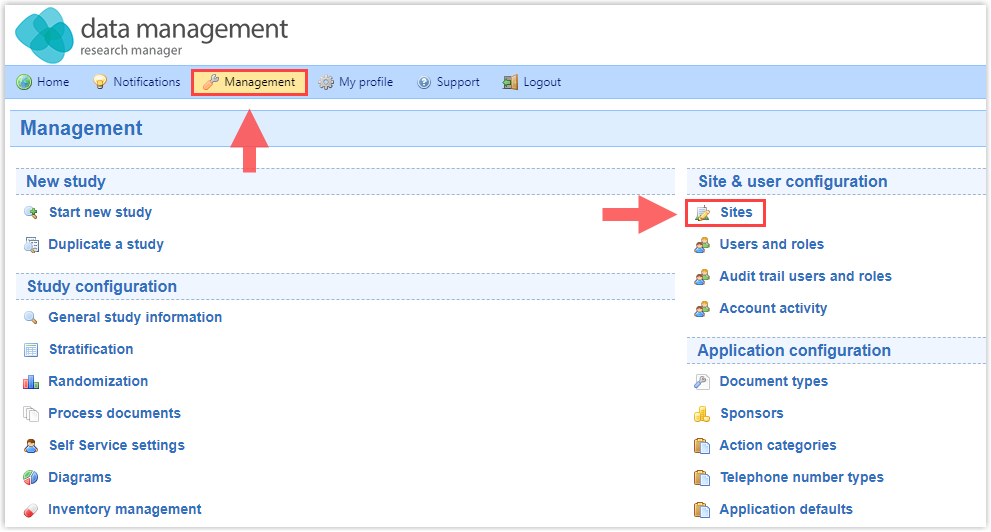
- Main menu - > Management - > Sites;
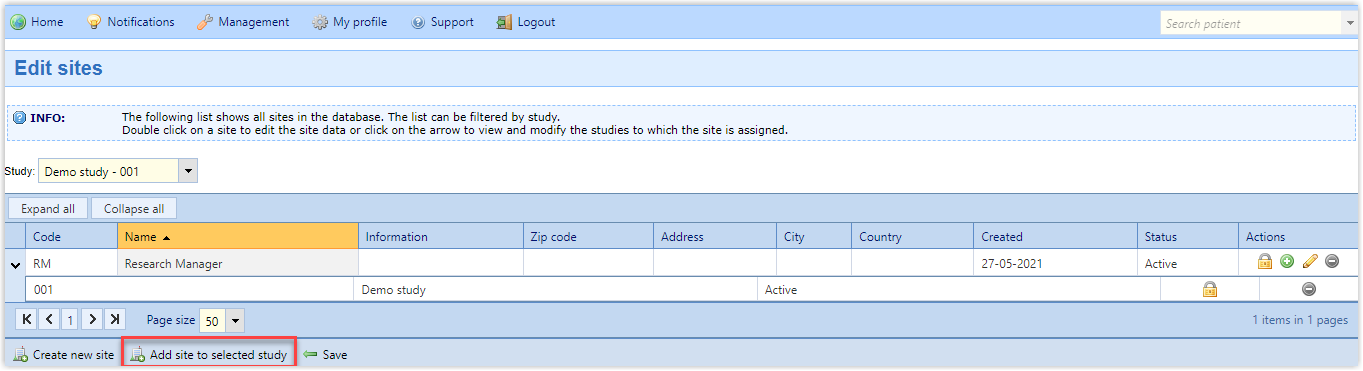
- Select the desired study in the dropdown menu;
- Click on ‘Add site to selected study’;
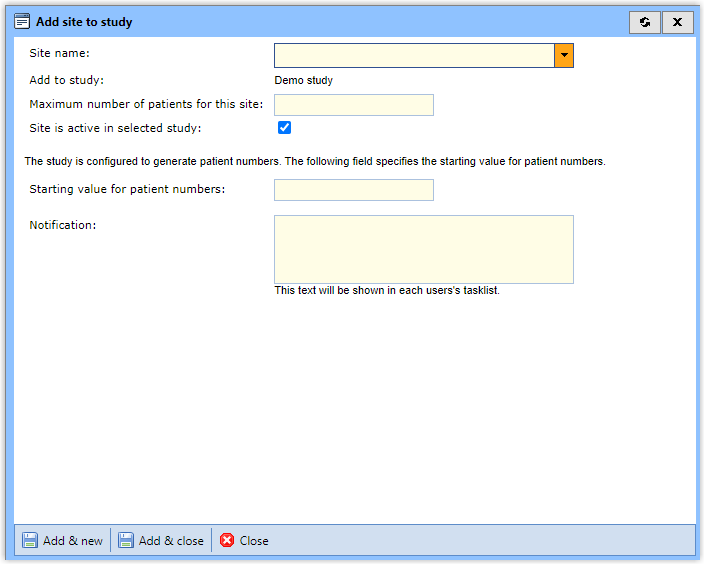
- Fill in the desired information;
- Click on ‘Add’
Extensive steps
Go tohttps://myresearchmanager.com/NameCustomer . Log in with your username and password.
Attention: Does your organization use multiple modules within ResearchManager? In that case it could be that you first enter the module portal. Click on “EDC (Data management)”. Dependent on your settings it could be that you enter one of our other modules first. If you do not see “EDC (Data management)” in the top left corner of your screen, click on the logo you do see to get to the module portal. Then, click on “EDC (Data management)” as well.
Step 1: Navigate towards ‘Sites’
Now you see the starting page. Click at the top, on the menu bar, on ‘Management’. Then, click under the heading ‘Site- and user settings’, on ‘Sites’.
Step 2: Option Sites list
Now you find yourself on the page with sites. You can filter the displayed sites on specific studies, on sites that do not use a single study or choose not to use a filter.
By clicking on the arrow on the left of a site name, the site unfolds and you can see to which studies it is linked. Click at the top on “Unfold all” to unfold all sites and on “Fold all” to hide the extra information again.
Step 3: Linking existing sites
Select the study to which you want to link one or more sites in the dropdown. Then click at the bottom on “Add site to selected study’’.
Step 4: Add new site
Now a pop-up opens. Here you need to select the site you want to add to the study. Then fill in the maximum amount of patients for this site and indicate whether the site is active or inactive in the selected study. If necessary write a notification.
When patient numbers from the study you selected are automatically generated, you will see an extra option. Fill in what you want the patient numbers for this site to start with. For example, this can be the code of the concerning site.
Step 5: Finish adding a site
Finally, click on “Add and new” to link the site to the selected study and add another one to it, or click on “Add and close” to link the site to the selected study an close the pop-up or click on “Close” to close the pop-up without saving.