If you are carrying out a research, you want to be sure that it is done in the correct and credible way. One of the ways ResearchManager helps with this is by keeping an audit trail. Here, all the data changes in the CRF are automatically saved. In this manual you read everything you should know about the audit trail of the CRF.
Preliminary information:
Go to https://myresearchmanager.com/NameCustomer . Log in with your username and password.
Attention: Does your organization use multiple modules within ResearchManager? In that case it could be that you first enter the module portal. Click on “EDC (Data management)”. Dependent on your settings it could be that you enter one of our other modules first. If you do not see “EDC (Data management)” in the top left corner of your screen, click on the logo you do see to get to the module portal. Then, click on “EDC (Data management)” as well.
Extensive steps:
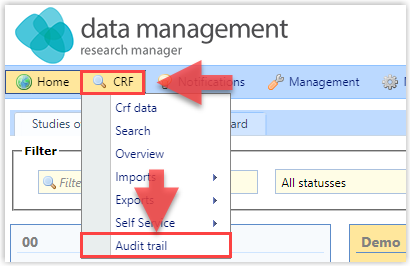
Step 1: Navigate towards ‘Audit trail’
Place your mouse in the main menu on ‘CRF’ and then click on ‘Audit trail’. Do you no see ‘CRF’ in the main menu? Then your study is not activated and the CRF not available. Do you not see ‘Audit trail’ under ‘CRF’? Then you do not posses the correct role – and the accompanying rights – to look at the audit trail. In this case contact the data manager of the study.
Step 2: Audit trail overview
Now you find yourself on the page with the audit trail. You see a list with all the changes that have been made, automatically sorted by date (newest on top). Of every change you can read the date, the component it is about, the patient number of the patient involved, the old and the new value, the user that made the change and any possible commentary.
If it is set up that when changing or filling invalid data an explanation needs to be given, this explanation will be in the column with remarks.
You can sort the list in to all available columns. This can be done by clicking on the title of a column. To sort by this another time, but in the reverse order, click on it another time. By clicking a third time, you no longer sort by the concerning column.
At the bottom of the list you can navigate towards the first, next, and last page. Here you can also change the amount of results displayed on one page.
Step 3: Filtering audit trail data
At the top of the page is a filter function. You can use this for when you are looking for all changes within a certain time period, of particular patient and/or done by a particular user. With “From” to “ Till” you select data. Then, you select a one or more components you want to see.
Standard, all components are selected. After this you look for a patient number and user. You can use as many or as little fields as you want. Finally, you click on the button “Filter”. Now only the changes that satisfy your filters will be shown.